Tuesday, October 25, 2022

{BYSHC} Falling for the Holidays Linky Party - Day 5


My second card for the {BYSHC} Falling for the Holidays Linky Party features products  from our new sponsor, Thermo Web.  Thermo Web generously sent several DT members an array of adhesive products for card makers to try. I have loved their deco foil for my Minc and was equally impressed with the adhesive products I used in my card.


Card Details:

The background of my card is made pairing a Baby Swiss Dots toner card front from designer, Laura Kelly, with Gold DecoFoil and running it through my Mini Minc machine.
I had a sheet of gold glitter paper in my stash, so Thermo Web's iCraft Easy Cut Adhesive Sheets came in handy to adhere the intricate Pinkfresh Snowflakes to the card front. I used it on the back of the glitter paper and Pixie Tape held the dies in place while I sent it through my die cut machine. Once I had the snowflakes in place on my card front, I used 1/4" Easy Tear Tape to adhere the panel to my card base.  To finish off the card, I added a gold foiled sentiment from Pinkfresh's Foiled Sentiments 4 Holiday collection using iCraft 3D foam squares and three Pinkfresh Gold Metallic Pearls with iCraft Ultrabond Adhesive. I tend to be overly generous with my dots of glue with sequins and jewels, and in the quest for the perfect glue for me - this one is a keeper! It dries clear and I don't see my usual trail of surplus glue around the pearls!!  

I hope you are able to play along with the Linky Party this week.  Just link your card in the Linky Party gallery on the BYSCH blog!! You have until Friday at midnight.  Each of our generous sponsors is contributing to the prizes that will be chosen after the party ends.  Good luck! Thanks for stopping by my blog!
In kindness, Cathy


Monday, October 24, 2022

Joy Clair Special Event 2022 Cat Lover's Hop

 Hello Cat Lovers!!  Welcome to the Joy Clair 2022 Cat Lovers Hop.  My card features the Just Kittten stamp set and Arty Triangles stencil - both available in the Joy Clair shop.


I made this card with one of my granddaughters in mind and colored the kitten the same color as her cat, Pancini.  The card base is embossed with a "smile" embossing folder that I inked and sprayed with water before running it through my embossing machine.  The panel the kitten is sitting on is first stenciled with the Arty Triangles stencil using Distress Oxide inks and then splattered with watered down white gouache paint. I fussy cut the cat and layered it on a second piece of paper for strength because I mounted the cat on a wobble spring.  The card is finished with a die cut, "hello", a twine bow, a sentiment from the set,  and some bling.  I couldn't figure out how to upload the video of the cat wobbling on my blog, so I've got a link to my FB page.


Friday, October 21, 2022

{BYSHC} - "Falling for the Holidays" Linky Party

It's here - the final {BYSHC} Linky Party for 2022!  A weeklong chance to build that stash of holiday cards before the craziness of the holiday season.  Just like the other linky parties, Crystal has arranged sponsors and PRIZES!!   

The background of my card is a stamp and stencil set from Pinkfresh Studio's Create and Connect Holiday event.  I embossed the Deco frame die (from the same event) to add some texture, but not cut it out.  I added Penny Black's Immense Joy cut from red glitter paper and used vellum inside the "o".  That sweet bunny is a retired red rubber stamp from Purple Onion Designs.  "Merry & Bright" is foiled in red and I finished the card with three  Pinkfresh clear iridescent drops. 

I hope you have a chance to play along with the Linky Party!  Just make your card(s) and add it to the link on the BYSHC Blog from October 21st through midnight on the 28th.  Enter as many times as you like!!  Thanks for stopping by my blog!  
In kindness, Cathy


Friday, October 14, 2022

{BYSHC} Sketch Challenge #27 - Holiday in Navy

 It's mid-October already! You have had two weeks of a new sketch inspiration on the {BYSH} Cardmakers blog. Sketch #27 features rectangles, which was a perfect chance for me to flip the sketch and ink up a Gus and Gertie image from Taylored Expressions.  

I started my card by going to my stash of Christmas patterned paper and pulled out a piece I bought from a scrapbook store in my area. It's called Holiday in the Alps, from Maja Designs. This paper is beautiful, sturdy, and has a vintage feel to it. I used both sides of the paper in my design. Choosing a navy patterned paper caused me to be careful with color choices, since it's not a traditional Christmas combination. I brought in pops of color with my main image.  The card base uses PTI's Border Bling Tin Stitch Die, and the rectangles are cut from one of the Scalloped Rectangle Dies from CC Designs.  The white heat embossed sentiment and stamp are from TE's Gus and Gertie- Holiday Adventures.  I die cut some snowflakes from older dies in my stash and popped on some clear sequins.  If you look closely you might see some additional sparkle around the images.  That's because I used TE's Iridescent Glitter Happy Medium with a Memory Box stencil from my stash, called Winter Scattered Flakes.

I hope you are able to play along with the {BYSH} Cardmakers this month. Christmas will be here before we know it!!  Post your card in the FB Group and in the Sketch #27 folder. Thanks for stopping by my blog!
In kindness, Cathy


Sunday, October 9, 2022

Sunflowers & A Mini Slimline Card

 I hope you had a chance to view the full Joy Clare Gather Together release on Friday - there are so many wonderful images in it!  I love the Such A Blessing digital stamp set and it sparked a few ideas, so I came back and made another card with the sunflower image.

My card design started on my computer screen.  I loved playing and creating so much for the card I made for the new release that I kept thinking of possibilities and came back to work with the sunflowers.  This was an even simpler process - all I had to do was drag and drop the image onto my word processing document, "copy", "paste", and move behind the first image.  Instead of a a trio of sunflowers, I was looking at a collection of five!  I added the "Hello" sentiment to the page, sized it, and printed with my inkjet printer!  

I colored the sunflowers with Copic markers and then fussy cut them.  The sentiment was trimmed and cut it into squares so I could use the letters vertically on my card.  I die cut a white background with Gina Marie's Scalloped Stitched Rectangle Mini Slimline dies and yellow patterned paper with Gina Marie's Wonky Stitched Rectangle Mini Slimline die.  You can find these two dies and the whole collection of Mini Slimline dies on special for $10 a set in the Joy Clair Designs Shop.

Thanks for stopping by my blog and taking a closer look at my card.  Hope you have a wonderful day.  
In kindness, Cathy


Friday, October 7, 2022

Joy Clair Designs - Gather Together Release


Hi All,

Today is an exciting day on the Joy Clair Designs Blog and Shop - it's a mini-release of four different digital stamp sets.  Each of our DT members is featuring a different stamp from the Gather Together collection; I know you will love them!  Two sets have a Christmas theme, one is fall, and the fourth is an all-occasion stamp with flowers and sentiments.


I had the pleasure of working with the Such A Blessing digital stamp set.  I am into coloring fall themes right now, so this was my jam!  Just look at these beautiful illustrations!!  One of the benefits of digital stamps is how versatile they are.  I used the "HELLO" sentiment, the sunflowers and the pumpkin on my card and layers them into a single image that I printed and colored.  I had as much fun creating the design digitally as I did coloring the card.


To create my design digitally, I started with the bigger pumpkin that looks like it is sitting straight, then I added a second pumpkin behind it. I made it a bit smaller, flipped it so the leaf was on the other side, and rotated its position a bit downward.  I positioned the sunflowers in front so they hid the smaller pumpkin from the image, and finally moved the "HELLO" in the back.  I loved the look of the stem in front of the E.  It's printed with an inkjet printer.  I make a couple of copies to sample coloring ideas on, and then I set about coloring the image.  I have a Lang calendar on my fridge, so I used the pumpkins from the calendar and a yellow flower image to help me color. 

Finally, I masked the image and sentiment so I could stamp a shiplap background stamp over the top.  I added a border to the bottom, die cut it with Gina Marie's Pleated Lace Rectangle Die, layered the image panel on green and white, and added some twine before I mounted it on a kraft card base.  I added three baubles and "done"!! I love the result!!

A bonus for Joy Clair fans - as part of this release, Mini Slimline Dies are featured for just $10.00 a set.  Now is the time to pick one or two sets up!!


I hope you will check out the rest of the DT creations and join us in celebrating this new release on the Joy Clair Blog and FB Group.  Make sure you take a look at the Mini-Slimline Dies, too!  Thanks for stopping by my blog.
In kindness, Cathy


Wednesday, October 5, 2022

Let's Craft & Create - Challenge # 188 The Colors of Fall

 Back with October's Let's Craft & Create Challenge #188.  The optional theme is "The Colors of Fall".  I went back to a wonderful autumn image from Joy Clair Designs, called Hey Pumpkin for my card.  This card features golds and oranges as the main colors. I used the same image with neutrals and some blues for another card at the end of September.  

My scrap drawer came in handy for all of the colored and patterned papers!  I love when I can use those cut pieces.  The background is run through Taylored Expressions Pierced Lattice Cover Plate and the image panel is backed with one of the Pleated Lace Rectangle Dies from Gina Marie Designs.  I masked off the image and then stamped my trusty SU! French Script background stamp using Crumb Cake ink and mounted the card on a white base.

I hope you have a chance to play along with the Let's Craft & Create DT this month. Thanks for stopping by my blog to take a closer look!
In kindness, Cathy


Tuesday, October 4, 2022

Joy Clair - Cup of Joy Shaker Card

 I'm on the Joy Clair Designs Blog with my first October post.  I am using a digital stamp set originally released for Mother's Day called Cup of Joy. With the right patterned papers, it's a set that can cross-over for many occasions.  

My sister-in-law loves both tea and flowers, so the top left image was a no-brainer to use for a card for her.  I decided right away to make a shaker card and went to my stash of patterned papers to find the "just right" paper. Maja Designs makes the paper I used in my card.  It's such a thick, gorgeous paper.  The plaid is the reverse side of the floral pattern.  It's another versatile product used in my card design because it's meant to be a Christmas paper.  I think the golds and the tones of pinks are perfect for a fall card. 

Detailed photos and the steps for constructing my shaker card along with my Copic colors  are in my October 4th post on the Joy Clair Designs Blog.  Reach out if you have any questions! Thanks for stopping by my blog.
In kindness, Cathy


Sunday, September 25, 2022

Copic Coloring & Joy Clair Design's Hello Pumpkin

 I am back on the Joy Clair blog today with another September Mood Board inspiration card.  This one features Hey Pumpkin, a 4x6 stamp available in the Joy Clair Designs Shop.  I love the image and had quite an adventure playing around with my patterned papers and enamel dots to finish off the card.  Using scraps from my scrap drawers and cutting into the patterned paper makes me happy!!  I have a good-sized stash!!

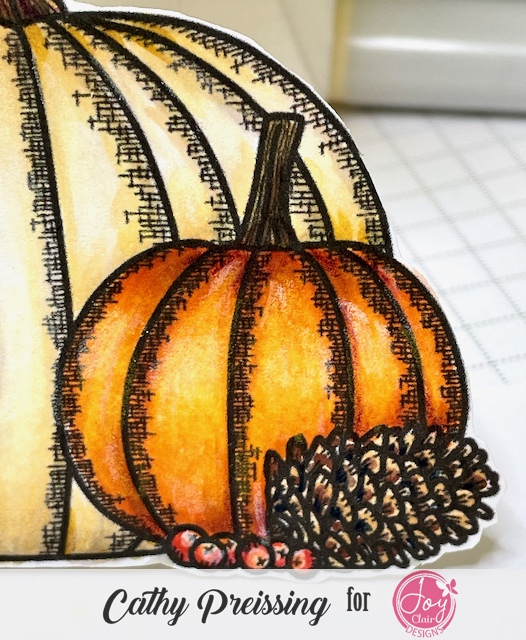
This image begged to be colored, so I broke out my Copics.  Oranges are a tricky combination in Copics, so I did my best with the YR markers I have in my collection.  As I have developed my coloring skills, I notice that when I am not happy with my coloring, I usually need to work on contrast.  This pumpkin needed something and I tried a bunch of combinations.  Before I put it away for the day, I tried one more idea and added a layer of Prismacolor colored pencils.  Sparingly and with a light touch, they are often just what I need to enhance my Copic work and bring a new dimension to my coloring.  I've zoomed in to part of the image so you can see what I mean:

I have added Prismacolor Premier Dark Purple #931 to deepen the shaded areas on the pumpkin and berries and Prismacolor Premier White  #938 for extra highlights on both.  I learned this technique from Amy Shulke at Vanilla Arts.  Her classes are amazing. She swears by the purple - and says it's a chameleon color because it can be used with so many colors.  I agree.  It's a rare card that I don't use it somewhere (unless I forget to pull out my pencils!!)! 

The beginning of October will be full of Joy Clair posts!  My next blog post is the 4th and then the Joy Clair Design October release drops on the 7th with so many fun images!  I have another post on the Joy Clair blog on the 9th.  Hope you will come back and see what I have been working on for you! 

Thanks for stopping by my blog.  
In kindness, Cathy


Friday, September 23, 2022

{BYSHC} Sketch Challenge #26 - Foiling Two Ways

This month's Build Your Stash Holiday Cardmakers Sketch is so much fun to play around with!  I took a little bit of liberty interpreting the sketch for my card.  The rectangle panel is Taylored Expressions (TE) Twiggy Background, which I heat embossed and foiled with gold foil using my Mini- Minc.  I used the same process of heat embossing and then foiling for  Creative Expressions Angelina's Christmas Stocking stamp. I colored the image in two steps. For the first layer, I used water with TE inks to watercolor the image.  For my second step, I Added additional color and shading with my Prismacolor colored pencils.  I die cut the oval frame from the main panel using Gina Marie Designs Scalloped Oval Frames, then fussy cut the stamped image, and glued it inside the oval.  I tied some seam binding from my stash at the bottom, added a TE sentiment, and glued some turquoise and gold gems to finish off the card.  Neither of my foiling attempts was perfect, but they were usable.  I learned to use the same color embossing powder under the foil - then when/if the foil doesn't stick, it isn't as noticeable.  I used white embossing powder, which can be seen a little more on the stocking image.  

I hope you are inspired to play along!  After you make a card, upload it in the {BYSHC} Sketch #26 Album.  Thanks for stopping by my blog.
In kindness, Cathy

Friday, September 9, 2022

Bright Bulb & Joy Clair September Mood Board

Joy Clair Designs has a monthly mood board for inspiration and the September Mood Board inspired my second Joy Clair DT card this month.
My mini-slimline card uses a variety of items you can find in the Joy Clair Store.

I started by printing and coloring the lightbulb image from the My Path Digital Stamp Set with my Copics and fussy cut it.  The background is Gina Marie's Blossom Dot Stencil with Distress Oxide inks.  It's then splattered with watered down white and brown inks and then stenciled over the top in random places with gold Delicata ink and stamped with PTI Scarlett Jewel.  It's die cut with the largest of Gina Marie's Scalloped Stitched Rectangle Mini Slimline dies.  The sentiment is printed and doe cut with the smallest die from Gina Marie's Wonky Stitched Mini Slimline dies.


I glued a variety of embellishments and tied gold thread onto the lightbulb and mounted the card onto a dark card base.  I loved working with the colors of this mood board and am excited about how this card turn out.  

Stay up to date with us by signing up for Joy Clair Designs newsletters.  You will receive notifications of new releases, sales, and exclusive offers for subscribers.  Follow along with Joy Clair creations on the Facebook Page, the Joy Clair Stamp Projects FB Group,  Instagram, Twitter, Pinterest, and You Tube!

Thanks for stopping my my blog.                         
  In kindness, Cathy 


Copics Used:  
Lightbulb- BG60, W3, 1, 0, 00, Y0000, Y000
Lightbulb base - E43, YR24, 32, Y28, 26
Leaves - E50, 31, 55
Flowers - YR 27, 18, 04, 12, E50

Inks Used:  
Scattered Straw Distress Oxide
Tattered Rose Distress Oxide
Dried Marigold Distress Oxide
Hickory Smoke Distress Oxide
Pumice Stone Distress Oxide
Crackling Campfire Distress 
Delicata Gold Pigment Ink
PTI Scarlett Jewel