Sunday, September 25, 2022

Copic Coloring & Joy Clair Design's Hello Pumpkin

 I am back on the Joy Clair blog today with another September Mood Board inspiration card.  This one features Hey Pumpkin, a 4x6 stamp available in the Joy Clair Designs Shop.  I love the image and had quite an adventure playing around with my patterned papers and enamel dots to finish off the card.  Using scraps from my scrap drawers and cutting into the patterned paper makes me happy!!  I have a good-sized stash!!

This image begged to be colored, so I broke out my Copics.  Oranges are a tricky combination in Copics, so I did my best with the YR markers I have in my collection.  As I have developed my coloring skills, I notice that when I am not happy with my coloring, I usually need to work on contrast.  This pumpkin needed something and I tried a bunch of combinations.  Before I put it away for the day, I tried one more idea and added a layer of Prismacolor colored pencils.  Sparingly and with a light touch, they are often just what I need to enhance my Copic work and bring a new dimension to my coloring.  I've zoomed in to part of the image so you can see what I mean:

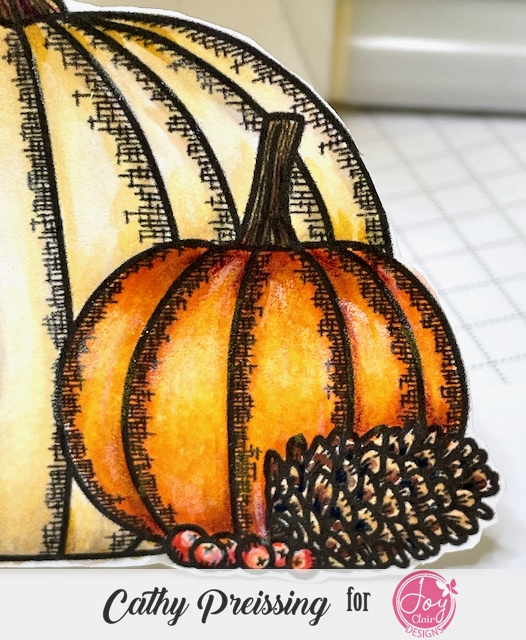
I have added Prismacolor Premier Dark Purple #931 to deepen the shaded areas on the pumpkin and berries and Prismacolor Premier White  #938 for extra highlights on both.  I learned this technique from Amy Shulke at Vanilla Arts.  Her classes are amazing. She swears by the purple - and says it's a chameleon color because it can be used with so many colors.  I agree.  It's a rare card that I don't use it somewhere (unless I forget to pull out my pencils!!)! 

The beginning of October will be full of Joy Clair posts!  My next blog post is the 4th and then the Joy Clair Design October release drops on the 7th with so many fun images!  I have another post on the Joy Clair blog on the 9th.  Hope you will come back and see what I have been working on for you! 

Thanks for stopping by my blog.  
In kindness, Cathy


Friday, September 23, 2022

{BYSHC} Sketch Challenge #26 - Foiling Two Ways

This month's Build Your Stash Holiday Cardmakers Sketch is so much fun to play around with!  I took a little bit of liberty interpreting the sketch for my card.  The rectangle panel is Taylored Expressions (TE) Twiggy Background, which I heat embossed and foiled with gold foil using my Mini- Minc.  I used the same process of heat embossing and then foiling for  Creative Expressions Angelina's Christmas Stocking stamp. I colored the image in two steps. For the first layer, I used water with TE inks to watercolor the image.  For my second step, I Added additional color and shading with my Prismacolor colored pencils.  I die cut the oval frame from the main panel using Gina Marie Designs Scalloped Oval Frames, then fussy cut the stamped image, and glued it inside the oval.  I tied some seam binding from my stash at the bottom, added a TE sentiment, and glued some turquoise and gold gems to finish off the card.  Neither of my foiling attempts was perfect, but they were usable.  I learned to use the same color embossing powder under the foil - then when/if the foil doesn't stick, it isn't as noticeable.  I used white embossing powder, which can be seen a little more on the stocking image.  

I hope you are inspired to play along!  After you make a card, upload it in the {BYSHC} Sketch #26 Album.  Thanks for stopping by my blog.
In kindness, Cathy

Friday, September 9, 2022

Bright Bulb & Joy Clair September Mood Board

Joy Clair Designs has a monthly mood board for inspiration and the September Mood Board inspired my second Joy Clair DT card this month.
My mini-slimline card uses a variety of items you can find in the Joy Clair Store.

I started by printing and coloring the lightbulb image from the My Path Digital Stamp Set with my Copics and fussy cut it.  The background is Gina Marie's Blossom Dot Stencil with Distress Oxide inks.  It's then splattered with watered down white and brown inks and then stenciled over the top in random places with gold Delicata ink and stamped with PTI Scarlett Jewel.  It's die cut with the largest of Gina Marie's Scalloped Stitched Rectangle Mini Slimline dies.  The sentiment is printed and doe cut with the smallest die from Gina Marie's Wonky Stitched Mini Slimline dies.


I glued a variety of embellishments and tied gold thread onto the lightbulb and mounted the card onto a dark card base.  I loved working with the colors of this mood board and am excited about how this card turn out.  

Stay up to date with us by signing up for Joy Clair Designs newsletters.  You will receive notifications of new releases, sales, and exclusive offers for subscribers.  Follow along with Joy Clair creations on the Facebook Page, the Joy Clair Stamp Projects FB Group,  InstagramTwitterPinterest, and You Tube!

Thanks for stopping my my blog.                         
  In kindness, Cathy 


Copics Used:  
Lightbulb- BG60, W3, 1, 0, 00, Y0000, Y000
Lightbulb base - E43, YR24, 32, Y28, 26
Leaves - E50, 31, 55
Flowers - YR 27, 18, 04, 12, E50

Inks Used:  
Scattered Straw Distress Oxide
Tattered Rose Distress Oxide
Dried Marigold Distress Oxide
Hickory Smoke Distress Oxide
Pumice Stone Distress Oxide
Crackling Campfire Distress 
Delicata Gold Pigment Ink
PTI Scarlett Jewel

Monday, September 5, 2022

Let's Craft & Create Challenge #186 - Frame It!

 "Frame It!" is the theme of this month's Let's Craft and Create Blog Challenge. 
I knew my Taylored Expressions Frame in Frame Cutting Plate would come in handy for my card.  I ended up choosing the largest of the four possible frames in the set for the pink frame at the edge of the image. The background is Altenew's Gradient Stripes Cover Die.  I think it's actually the first time I have used it on a card, but it's been in my stash for a few years!  One of those "must have" purchases - and then it sits unloved in my stash!!  I love how the Altenew die and paper color work together to highlight the star of the show - Pinkfresh Studio's Handpicked Flowers.  It's a suite of products that was part of their May Stamp & Create event and includes stamps, layering stencils, and a die. It hasn't been released but if my card inspires you, there are many other Pinkfresh sets like this you could use to achieve the same effect. 

For my card, stamped the image and then heat embossed it.  To get the foiled look, I used gold Deco Foil and a Minc on setting #2.  I have been playing around with foiling over heat embossed sentiments and stamped images both with a laminator and Minc.  I am still experimenting to try and have consistent results.  Ideally, I would have liked the lines of this image to be a little crisper, but it was still useable.  I then brought out the stencil from the set and added layers of Taylored Expressions inks, die cut the image, and popped it out with foam strips.  Finally, I added two colors of pink enamel dots and a Pinkfresh foiled ephemera sentiment.    

I hope you will have time to play with our challenge this month. I am looking forward to seeing the way folks interpret the theme in the LC&C Challenge #186 gallery!  Thanks for stopping by my blog.  
In kindness, Cathy

Challenges Entered:

The Flower Challenge #72 - September - Add Sparkle
NBUS #42 / September
Tic Tac Toe #177 /Diagonal top left & down - fall floral, leaves, metallic


Sunday, September 4, 2022

Wildflower Florals & Joy Clair DT

I am excited to share my first post as a member of the Joy Clair Designs DT.  Creating the card came at the same time I went to Blue Sky Flower Farm, a pick your own wildflower flower garden.  The bouquet I created at their Friday Night Flower Night inspired my card.  


The image is from Joy Clair's Sending a Little Message Digital stamp set which includes two flower images and three sentiments. I printed the flower vase and the sentiment on kraft colored paper and colored it with my Prismacolor Premier colored pencils. 

 I splattered the colored vase image with white, brown, and dark pink ink.  When using kraft paper, I like to bring in white to brighten things up, so I used a white frame and another frame for the patterned paper.  Some embellishments and a bow tied to the sentiment flag finished off the card.

You can see the way the real bouquet influenced my coloring.  I was drawn to the yellow and red flowers because they were so vibrant and had purples, magenta, red and yellow.  The photo is four days old and their  magenta has started to fade.  There were tiny white flowers with yellow centers, which I used in my card, and then purple and blues for another flower.  

Be sure to sign up for Joy Clair Designs newsletters.  you will receive notifications of new releases, sales, and exclusive offers for subscribers.  You can also follow the Joy Clair creations on the Facebook Page, the Joy Clair Stamp Projects FB Group, Instagram, Twitter, Pinterest, and You Tube!

Thanks for stopping my my blog.                                                        In kindness, Cathy 

Challenges Entered:
NBUS #42 - September
Colorful Options September - Beautiful Brown

Thursday, September 1, 2022

{BYSHC} Sketch Challenge #26 - Winter Shaker

This month's Build Your Stash Holiday Cardmakers sketch was inspired by a card DT member, Jacinda Chen, created for our BYSHC Christmas in July Linky Party.  

I used stamps from Snarky Cat Christmas by Stamper's Anonymous for my card. I was playing around with comparing black foil with black embossing powder for this card.  I honestly didn't see much of a difference.  The width of the green mat for the rectangle panel was the same size as the largest die from Lawn Fawn's Small Mini Slimline Stackable Rectangle set, so I was able to take advantage of the stitched detail for the sides.  After mounting the panel onto the background paper, I cut the circle element of the sketch using Lawn Fawn's Reverse Stitched Scalloped Circle Window die. From there, I added foam strips to the front of the cat panel and used sequins and a piece of clear acetate from my stash to create a shaker and mounted the whole thing to a card base.  A "hello" speech bubble die from my stash, some small sequins on the sentiment strip, and a black foiled bow finished off the card.

Hope you can play along with the BYSHC challenge this month.  It's a great way to work ahead on your holiday cards!  Thanks for stopping by my blog.  
In kindness, Cathy